The complete installation guide for your CCTV Cameras is written perfectly in this article.
There are basically TWO types of CCTV Camera:
1-Analog cameras or digital cameras
2-IP Cameras
Installing an IP camera system can be a difficult task, especially if you’re not familiar with the technology. But with a little planning and guidance, you can do it yourself. I can help guide you through the process of installing an IP camera system in a user-friendly way. Here’s a step-by-step guide:
Step 1: Determine the location and Gather your equipment:
Before you start, identify the areas you want to monitor. Consider entry points, critical areas, and any blind spots. Sketch a rough map of your site and mark where you’d like to install cameras.
Before you start, make sure you have all of the equipment you need. This includes:
- IP cameras
- Network video recorder (NVR)
- Ethernet cables
- PoE switch (if your cameras don’t have built-in PoE)
- Mounting brackets
- Power adapters (if your cameras don’t have built-in PoE)
- Tools (screwdriver, drill, etc.)
Step 2: Choose the Right Cameras and their brands:
Select IP cameras that meet your needs. Look for features like resolution, night vision, weatherproofing (if they’ll be outdoors), and any specific functionalities like PTZ (Pan, Tilt, Zoom) if you need them.
You can also check the Introduction to Arlo CCTV Cameras
Step 3: Install the NVR:
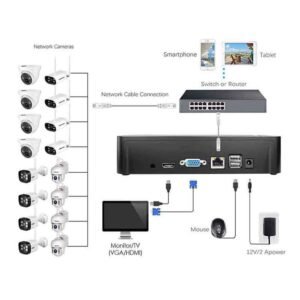
The Network Video Recorder (NVR) is the heart of your IP camera system. It’s responsible for recording and storing video footage from your cameras. To install the NVR, follow these steps:
- Find a central location for the NVR. It should be close to your router and have enough space for ventilation.
- Connect the NVR to your router using an Ethernet cable.
- Connect the NVR to a power outlet.
- Power on the NVR and follow the on-screen instructions to set it up.
Step 4: Setup Network Infrastructure:
Ensure that you have a reliable network connection where you plan to install the cameras. If not, consider boosting your Wi-Fi signal or running Ethernet cables to the camera locations.
Step 5: Install/Mount the Cameras:
Follow the camera’s installation manual to securely mount them:
- Mount the camera bracket to the wall or ceiling using the appropriate screws.
- Attach the camera to the bracket.
- Connect the camera to the NVR using an Ethernet cable.
- Connect the camera to a power source (either PoE or a power adapter).
- Power on the camera.
Step 6: Connect the Cameras:
If you’re using PoE (Power over Ethernet) cameras, connect them to the PoE injector or switch using Ethernet cables. The injector or switch will also provide power to the cameras. Ensure a snug and weatherproof connection.

Step 7: Configure Camera Settings:
Once the cameras are installed, you need to configure them to your liking. Most IP cameras have a web interface that allows you to configure settings. Access this interface through a web browser and follow the camera’s manual to set up things like resolution, motion detection, and recording settings.
This includes setting the following:
- The IP address of the camera
- The subnet mask of the camera
- The default gateway of the camera
- The DNS server of the camera
- The username and password for the camera
- The recording schedule for the camera
- The motion detection settings for the camera
Step 8: Testing the System:
Check the camera feeds and ensure they cover the areas you want to monitor. Test the motion detection and recording capabilities to make sure they work as expected.
- Checking that the cameras are recording video
- Checking that the motion detection is working
- Checking that you can view the video footage remotely
Security and Maintenance
Change the default login credentials for your cameras to enhance security. Regularly update firmware and software. Clean camera lenses to maintain image quality.
If you encounter any difficulties or have specific questions along the way, you can refer to the documentation that came with your IP camera system. You can also contact the manufacturer or installer of your IP camera system for support.
It’s essential to have a working camera system that suits your needs and provides peace of mind.

